Static Blog Setup with Hexo, Amazon S3 and Grunt - Hosting on Amazon S3
This is Part-2 in the series of posts on “Static Blog Setup with Hexo, Amazon S3 and Grunt“. You can view all the posts in this series here, Static Blog Setup with Hexo, Amazon S3 and Grunt.
In the last post, we setup the blog on our local machine and tested it. Now, let’s move it to a server which will host our blog. We will be using Amazon S3 as it’s easy to setup and do deployments. Then, I will give a brief overview on setting up DNS entries for the different blog domain/subdomains.
Hosting on Amazon S3
First, create an account on AWS and get a unique access ID which will be used as the login to access the different services provided by AWS, in our case, Amazon S3.
Before we start, let’s quickly discuss how we will set it up. When creating web apps, multiple environments are created for testing and previewing the app before it goes live. For example, you can have a dev environment for local testing, staging environment for previewing before it goes live and production, which will be the live site. For our blog, we will follow the web app development methodology and create 3 environments for local testing (development), previewing the site (staging) and finally the live site (production).
I suggest reading Setting up a static blog on S3 documentation to get a basic idea of how S3 works. In short, S3 works on the concepts of buckets. For our blog, we will create 3 buckets to store our blog data, basically, the contents of public folder which Hexo creates and has all the static files after generating.
Creating the buckets
Once you login to AWS, go to the console and click on S3. Click on “Create Bucket” and enter the bucket name.
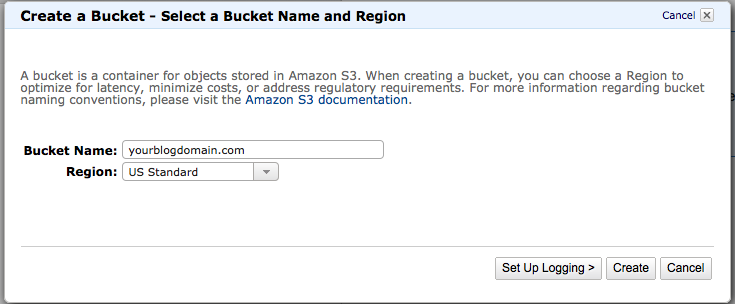
Make sure the bucket names corresponds to the domain/subdomain names as it will be easier to configure URL’s for routing later.
Create 3 buckets for your blog domain:
- yourblogdomain.com
- www.yourblogdomain.com
- staging.yourblogdomain.com
You will notice we have 2 buckets with the blog domain, one with “www” and one without it. That’s because, once the site is ready to go live, we will configure the “www.yourblogdomain.com" bucket redirect to “yourblogdomain.com” or vice-versa.
The option to host the static website is disabled by default. Let’s enable it:
- Click on “Properties” for the selected bucket.
- Under “Static Website Hosting” section, you’ll find “Enable website hosting”. Click it.
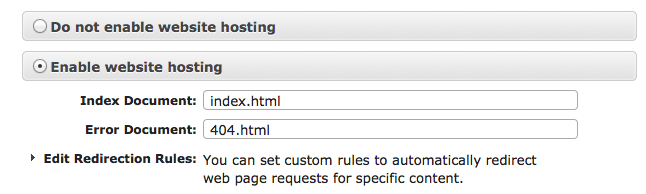
- It gives the options to specify path for your “index” page, which is the blog landing page, and the error page. In my case, it will be index.html and 404.html as it’s located directly in the root.
- Save the changes
Now, we have our 3 environments setup, namely:
- local machine setup for (development),
- staging bucket on s3 for (staging) environment [staging.yourblogdomain.com]
- (production) buckets for the live site [yourblogdomain.com, www.yourblogdomain.com]
You can upload the public folder static files using the “Upload” button into the buckets. Now, let’s setup the DNS for these buckets so they are active and ready to use.
DNS Changes
This section assumes you have bought your domain either through Go Daddy, Network Solutions or some other domain registrar.
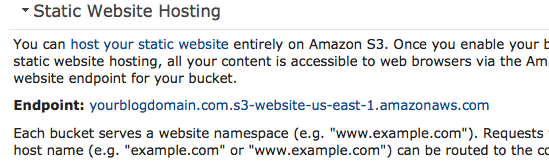
Currently, you can access your bucket through a very long and unfriendly URL such as:
Let’s route it to the bucket name you have created using Route 53, which is Amazon’s cloud DNS service. I won’t go into too much detail on setting it up but basically, you need to create CNAME records for the “www” subdomain and the “staging” subdomain and point it to the long url as shown above for the associated bucket. For the root domain, you need to create an A record and point it to the root domain’s bucket. You can read more about it here, Migrating an Existing Domain to Amazon Route 53.
After setting up the DNS, it will take some time to propagate anywhere from 5 min to a couple of days. Once it propagates, you will be able to go yourblogdomain.com or staging.yourblogdomain.com and see your blog. You have just finished setting up hosting for your blog.
If you face any issues, do not hesitate to leave a comment or Contact Me. :)
In the next and final post, I will cover how we can automate the deployment using Grunt so you can only focus on writing creative and informative posts and not worry about pushing the changes to S3 every time.